1.MUSOPEN
2.Freepd
3.耳聆网
4.淘声网
6.ZAPSPLAT
7.蒼月音
8.甘茶の音楽工房
9.小森平免费音效
10.dig.ccmixter
11.FMA
13.CCTRAX
15.freesound
16.KENNEY游戏音效
17.POND5
1.MUSOPEN
2.Freepd
3.耳聆网
4.淘声网
6.ZAPSPLAT
7.蒼月音
8.甘茶の音楽工房
9.小森平免费音效
10.dig.ccmixter
11.FMA
13.CCTRAX
15.freesound
16.KENNEY游戏音效
17.POND5
2.Benianus 3D
blender格式,CC0协议
3.绑匪呢
绑匪老师yyds!!!可商用的skp格式模型
4.polyhaven
有贴图,HDR,模型,都是CC0协议的
6.3d-wolf
8.kenney
10.blendfile
11.publicdomainmodels
CC0协议,整理下载到网盘里了
链接:https://pan.baidu.com/s/1lB3Gh_PXN7VNtah2vCbDGg
提取码:2333
12.chocofur
CC0协议,blender格式的模型,网盘下载整理到了3.0资产库里
链接:https://pan.baidu.com/s/1OYiFSkz3R-sd7zg7wYfloQ
提取码:2333
13.克利夫兰艺术博物馆
克利夫兰艺术博物馆开放了馆藏公共领域艺术品的数字版权
14.Open Access
16.TFMSTYLE
C4D模型
17.rickdellis
C4D模型
18.Brandon Funk
19.leszczynski
链接:https://pan.baidu.com/s/15MPMvw_128hKGCLjelj91A
提取码:2333
21.Davide Tirindelli
blender格式的模型,蛮多免费的产品,也有部分需要署名,具体看作者作品备注说明
24.cgtrader
很多格式模型,具体协议要看作者产品许可
25.Viz-People
模型不是很多,MAX模型,也有其他的
26.blenderkit
27.plaggy
CC0协议
28.VOiD1 Gaming
34.3dicons
开源模型
35.3DModelsCC0
开源模型
10.chocofur
11.blendermada
13.BIS
需要下载插件,blender在线程序化纹理库
插件原地址:https://korchiy.gumroad.com/l/eQeFC?recommended_by=library
插件:链接:https://pan.baidu.com/s/1gLWKnDClDbvi3eTm7s4MNw 提取码:2333
14.blenderkit
这个基本上用搅拌机的都知道吧,有模型,贴图,HDR等
15.Julio Sillet 3D Art
CC-BY协议,可以商用但要署名。

16.duion
CC0协议
出现该问题一般是由于,服务器没有关闭“Windows Update”,建议在服务器上设置更新机制为“从不检查更新(不推荐)”。禁用windows uopdate方法很多,也可以在服务列表中禁用windows update。
尝试前两种方法,均没能解决问题,最后只能使用第三种方法——通过各种方法关闭“Windows Update”。
依次点击如下如图所示路径
在右侧空白区域,新建一个DWORD至,命名为“NoWindowsUpdate”,然后双击打开,将其值设为“1”。
Source: Windows Central
Microsoft is developing a new Office mobile app for Android and iOS devices, which is similar to the experience for Windows 10, but it’s a lot more useful. Unlike the lighter desktop experience, the new app combines all the productivity apps and tools into a single install package that takes less space on your phone. This means that with a single download, you can access Word, Excel, and PowerPoint without having to switch apps, and you even get access to other features, such as Lens, Notes, and PDFs from one place.
However, the Office app doesn’t introduce new features. Instead, it surfaces all the tools and features already available into an user-friendly interface. For example, the app gives you quick access to your recent documents and notes, and there’s a new “Actions” pane with quick access to transfer files, extract text from images, and manage PDF files, including the ability to sign documents, and much more.
The app is in the early stages of development, but there’s a preview that anyone can download and use to test the new experience and features expected to arrive when the final version releases.
In this guide, we’ll walk you through the steps to get started with the new Office mobile app on your Android device.
To install the latest preview of the Office app on Android from your PC, use these steps:
Once you complete the steps, the new Office app will install automatically on your phone.
To set up the Office app preview on your phone, use these steps:
Quick note: You don’t need to connect your account to use the app, but signing in will allow you to access and edit documents on your OneDrive account.
After you complete the steps, you can start using the new Office app and all its new features.
The app is divided into three sections. The top header allows you to access your account information and settings as well as a Home menu to filter documents by format (Word, Excel, PowerPoint, PDF, Media, and Notes).
In the top-left, you can access the Browse option to look for files on different accounts and locally stored on the phone manually, and the option to search files.
In the middle section is where your recent and recommended documents are listed. You can simply tap the document to open it with the appropriate application without leaving the Office experience.
Then at the bottom, you’ll find another Home button, a Plus button to create notes, snap images using Lens, or create a new Word, Excel, and PowerPoint document.
For instance, if you want to grab text from a printed document, brochure, street sign, etc., you can snap a picture and then let Lens do the rest using these steps:
Alternatively, you can tap the Plus button, then the Documents option, and then select whether to scan directly to Word, Excel, or PowerPoint. Also, from the Documents menu, you can create new blank documents, workbooks, and presentations.
Then, there’s the Actions button, which allows you to access a number of common tasks, such as to send or receive files from your phone to a computer or nearby phone. Also, you’ll find the same options to scan an image or table to extract text or table information into a Word or Excel document.
If you have to transfer a file from your phone to another computer, the process is straightforward (no account or OneDrive setup required), you only need to follow these steps:
In addition to send documents, you can also use this feature to transfer files from your device to your phone without the need of a Microsoft account.
Another interesting feature is the ability to manage PDF documents in a number of ways. Using the Office mobile app, you can add a signature to a PDF using just your finger. You can scan a picture to a PDF file, or create a document from an existing image, as well as convert an Office file into a PDF.
For example, if you want to sign a PDF document using the Office mobile app, you can use these steps:
Quick note: The document must have editing permissions for the signature feature to work.
Finally, the Actions pane includes a Scan QR Code option to scan links or text and save it as a note in the app.
Although most of these features have been available for a long time, the new Office mobile app makes them easier to find and use, and bringing Word, Excel, and PowerPoint to the central hub removes the frictions of moving back and forth between apps.
During my short time testing the app, the overall experience felt really good, and the menus were intuitive and features easy to understand.
We’re focusing this overview on Android devices, but the new experience is also available on iOS. However, at the time of this writing, the test flight program has reached its limit of participants.
android的五种数据存储方式
默认存储路径:
/data/data/<PackageName>/files
文件操作模式:
MODE_PRIVATE(默认):覆盖、MODE_APPEND:追加
public void save(){
String data = "save something here";
FileOutputStream out = null;
ButteredWriter writer = null;
try{
out = openFileOutput("data",Context.MODE_PRIVATE);
writer = new ButteredWriter(new OutputSreamWriter(out));
writer.write(data);
}catch(IOException e){
e.printStackTrace();
}finally{
try{
if(writer!=null){
writer.close();
}
}catch(IOException e){
e.printStackTrace();
}
}
public String load(){
FileInputStream in = null;
ButteredReader reader = null;
StringBuilder builder = new StringBuilder();
try{
in = openFileInput("data");
reader = new ButteredReader(new InputStreamReader(in));
String line= "";
while((line = reader.readline()) != null){
builder.append();
}
}catch(IOException e){
e.printStackTrace();
}finally{
if(reader != null){
try{
reader.close();
}catch(IOException e){
e.printStackTrace();
}
}
}
}
默认存储路径:
/data/data/<PackageName>/shared_prefs
操作模式:
MODE_PRIVATE(默认):只有当前的应用程序才能对文件进行读写、MODE_MULTI_PROCESS:用于多个进程对同一个SharedPreferences进行读写。
存储数据格式:
键值对
SharedPreferences.Editor editor = getSharedPreferences("data",MODE_PRIVATE).edit();
editor.putString("name","ZhangSan");
editor.putInt("age",12);
editor.putBoolean("isMarried",false);
editor.commit();
SharedPreferences pref = getSharedPreferences("data",MODE_PRIVATE);
String name = pref.getString("name");
int age = pref.getInt("age");
boolean isMarried = pref.getBoolean("isMarried");
默认存储路径:
/data/data/<PackageName>/databases
数据类型
public class MyDatabaseHelper extends SQLiteOpenHelper{
public static final String CREATE_BOOK = "create table book ( "
+ " id integer primary key autoincrement,"
+ " author text,"
+ "price real,"
+ "pages integer,"
+ "name text)";
private Context context;
public MyDatabaseHelper (Context context, String name, CursorFactory factory, int version) {
super(context, name, factory, version);
this.context = context;
}
@Override
public void onCreate(SQLiteDatabase db) {
db.execSQL(CREATE_BOOK);
}
//当打开数据库时传入的版本号与当前的版本号不同时会调用该方法
@Override
public void onUpgrade(SQLiteDatabase db, int oldVersion, int newVersion) {
}
}
在MainActivity中
MyDatabaseHelper helper = new MyDatabaseHelper(this,"BookStore.db",null,1);
//检测到没有BookStore这个数据库,会创建该数据库并调用MyDatabaseHelper中的onCreated方法。
helper.getWritableDatabase();
public class MyDatabaseHelper extends SQLiteOpenHelper{
......
//当打开数据库时传入的版本号与当前的版本号不同时会调用该方法
@Override
public void onUpgrade(SQLiteDatabase db, int oldVersion, int newVersion) {
db.execSQL("drop table if exists Book");
onCreate(db):
}
}
在MainActivity中只需将version改为大于原来版本号即可。
MyDatabaseHelper helper = new MyDatabaseHelper(this,"BookStore.db",null,2);
helper.getWritableDatabase();
insert()方法,参数一表名,参数二是在未指定添加数据的情况下给某些可为空的列自动赋值为NULL,设置为null即可,参数三是ContentValues对象。
MainActivity
SQLiteDatabase db = helper.getWritableDatabase();
ContentValues values = new ContentValues();
values.put("name","The Book Name");
values.put("author","chen");
values.put("pages",100);
values.put("price",200);
db.insert("Book",null,values);
update()方法,参数一是表名,参数二是ContentValues对象,参数三、四是去约束更新某一行或某几行的数据,不指定默认更新所有。
MainActivity
SQLiteDatabase db = helper.getWritableDatabase();
ContentValues values = new ContentValues();
values.put("price",120);
db.update("Book",values,"name= ?",new String[]{"The Book Name"});
delete()方法,参数一是表名,参数二、三是去约束删除某一行或某几行的数据,不指定默认删除所有。
MainActivity
SQLiteDatabase db = helper.getWritableDatabase();
db.delete("Book","pages> ?",new String[]{"100"});
query()方法,参数一是表名,参数二是指定查询哪几列,默认全部,参数三、四是去约束查询某一行或某几行的数据,不指定默认查询所有,参数五是用于指定需要去group by的列,参数六是对group by的数据进一步的过滤,参数七是查询结果的排序方式
MainActivity
SQLiteDatabase db = helper.getWritableDatabase();
Cursor cursor = db.query("Book",null,null,null,null,null,null);
if(cursor.moveToFirst()){
do{
String name = cursor.getString(cursor.getColumnIndex("name");
String author = cursor.getString(cursor.getColumnIndex("author");
int pages = cursor.getString(cursor.getColumnIndex("pages");
double price = cursor.getString(cursor.getColumnIndex("price");
}while(cursor.moveToNext());
}
cursor.close():
//添加数据
db.execSQL("insert into Book(name,author,pages,price) values(?,?,?,?) "
,new String[]{"The Book Name","chen",100,20});
//更新数据
db.execSQL("update Book set price = ? where name = ?",new String[]
{"10","The Book Name"});
//删除数据
db.execSQL("delete from Book where pages > ?",new String[]{"100"});
//查询数据
db.execSQL("select * from Book",null);
SQLiteDatabase db = helper.getWritableDatabase();
db.beginTransaction(); //开启事务
try{
......
db.insert("Book",null,values);
db.setTransactionSuccessful(); //事务成功执行
}catch(SQLException e){
e.printStackTrace();
}finally{
db.endTransaction(); //结束事务
}
ContentProvider主要用于不同的程序之间实现数据共享的功能。
工具类ContentResolver
,提供了一系列方法对数据进行CRUD操作。
1、内容URI
内容URI是由权限和路径组成的,权限是用于区分不同的应用程序,一般是以包名来命名。路径是用于区分同一个应用程序的不同表。
//包名为com.example.app的表table1访问路径
Uri uri = Uri.parse("content://com.example.app.provider/table1");
2、使用Uri对象进行数据操作
Cursor cursor = getContentResolver().query(uri,null,null,null,null);
if(cursor != null){
while(cursor.moveToNext()){
String column1 = cursor.getString(cursor.getColumnIndex("column1"));
String column2 = cursor.getString(cursor.getColumnIndex("column2"));
}
cursor.close();
}
ContentValues values = new ContentValues();
values.put("column1","text");
values.put("column2",1);
getContentResolver().insert(uri,values);
作者:cy_why
链接:https://www.jianshu.com/p/536ca489a7f4
來源:简书
简书著作权归作者所有,任何形式的转载都请联系作者获得授权并注明出处。
大家都应该有过从百度文库下载东西的经历,对于下载需要下载券的文章,我们可以办理文库VIP(土豪的选择):
有的人也会在某宝购买一定的下载券,然后进行下载。而另一些勤勤恳恳的人,则会选择上传文章,慢慢攒下载券。任劳任怨的人,则会自己一点一点的复制粘贴,复制到word里文字太大,那就复制到txt文件里。而既不想花钱又不想攒下载券,也不想一点一点复制粘贴的人,会选择“冰点文库”这样的下载软件,不过貌似现在“冰点文库”已经不能使用了。当然,还有一些其他破解方法,比如放到手机的百度文库APP里,另存为文章,不需要下载券就可以下载文章。诸如此类的方法,可谓五花八门。而对于学习爬虫的人来说,面对怎样免费下载一个付费的word文章的问题,第一个想到的应该就是:自己写个程序搞下来。
2
我们以如何下载下面这篇文章为例,分析问题:
URL : https://wenku.baidu.com/view/aa31a84bcf84b9d528ea7a2c.html
我想,看到这样的一个文章,如果爬取当前页面的内容还是很好爬的吧。感觉so easy!至少我当时是这么想的,但是当把文章翻到最下方的时候,我看到了如下内容:
呃….需要点击“继续阅读”才能显示后续的内容,我单爬这一页内容,是爬不到后续的内容的。第一个想到的方法是,抓包分析下,然后我又一次蒙逼了:
Request URL这么长!!最后的expire时间信息好解决,其他的信息呢?不想做无谓的挣扎,因此,我果断地放弃这个方法。
问题:获取当前页的内容好办,怎么获取接下来页面的内容?
带着这个思考,Selenium神器走入了我的视线。
3
Selenium 是什么?一句话,自动化测试工具。它支持各种浏览器,包括 Chrome,Safari,Firefox 等主流界面式浏览器,如果你在这些浏览器里面安装一个 Selenium 的插件,那么便可以方便地实现Web界面的测试。换句话说叫 Selenium 支持这些浏览器驱动。Selenium支持多种语言开发,比如 Java,C,Ruby等等,而对于Python,当然也是支持的!
3.1.3.1 小试牛刀
我们先来一个小例子感受一下 Selenium,这里我们用 Chrome 浏览器来测试。
运行这段代码,会自动打开浏览器,然后访问百度。
如果程序执行错误,浏览器没有打开,那么应该是没有装 Chrome 浏览器或者 Chrome 驱动没有配置在环境变量里。下载驱动,然后将驱动文件路径配置在环境变量即可。
驱动下载地址:https://sites.google.com/a/chromium.org/chromedriver/downloads
windows下设置环境变量的方法:,输入,点击确定,出现如下对话框:
选择高级->环境变量。在系统变量的Path变量中,添加驱动文件路径即可(注意:分号)。
Linux的环境变量也好设置,在文件中export即可,记得。
当然,你不设置环境变量也是可以的,程序可以这样写:
上面的 是你的chrome驱动文件位置,可以使用绝对路径。我们通过驱动的位置传递参数,也可以调用驱动,结果如下图所示:
3.1.3.2 模拟提交
下面的代码实现了模拟提交提交搜索的功能,首先等页面加载完成,然后输入到搜索框文本,点击提交,然后使用page_source打印提交后的页面的信息。
全自动的哦,程序操控!是不是很酷炫?
其中 driver.get 方法会打开请求的URL,WebDriver 会等待页面完全加载完成之后才会返回,即程序会等待页面的所有内容加载完成,JS渲染完毕之后才继续往下执行。注意:如果这里用到了特别多的 Ajax 的话,程序可能不知道是否已经完全加载完毕。
WebDriver 提供了许多寻找网页元素的方法,譬如 的方法。例如一个输入框可以通过 方法寻找 name 属性来确定。
然后我们输入来文本然后模拟点击了回车,就像我们敲击键盘一样。我们可以利用 Keys 这个类来模拟键盘输入。
最后最重要的一点是可以获取网页渲染后的源代码。通过,输出 属性即可。这样,我们就可以做到网页的动态爬取了。
3.1.3.3 元素选取
关于元素的选取,有如下API:
单个元素选取:
多个元素选取:
另外还可以利用 By 类来确定哪种选择方式:
By类的一些属性如下:
这些方法跟JavaScript的一些方法有相似之处,,就是根据标签的id属性查找元素,,就是根据标签的name属性查找元素。举个简单的例子,比如我想找到下面这个元素:
我们可以这样获取它:
前三个都很好理解,最后一个xpath什么意思?这个无需着急,xpath是非常强大的元素查找方式,使用这种方法几乎可以定位到页面上的任意元素,在后面我会进行单独讲解。
3.1.3.4 界面交互
通过元素选取,我们能够找到元素的位置,我们可以根据这个元素的位置进行相应的事件操作,例如输入文本框内容、鼠标单击、填充表单、元素拖拽等等。由于篇幅原因,我就不一一讲解了,主要讲解本次实战用到的鼠标单击,更详细的内容,可以查看官方文档。
比如上面这句话,我使用找到元素位置,暂且不用理会这句话什么意思,暂且理解为找到了一个按键的位置。然后我们使用click()方法,就可以触发鼠标左键单击事件。是不是很简单?但是有一点需要注意,就是在点击的时候,元素不能有遮挡。什么意思?就是说我在点击这个按键之前,窗口最好移动到那里,因为如果这个按键被其他元素遮挡,click()就触发异常。因此稳妥起见,在触发鼠标左键单击事件之前,滑动窗口,移动到按键上方的一个元素位置:
上面的代码,就是将窗口滑动到page这个位置,在这个位置,我们能够看到我们需要点击的按键。
3.1.3.5 添加User-Agent
使用webdriver,是可以更改User-Agent的,代码如下:
使用Android的User-Agent打开浏览器,画风是这样的(第二条新闻的图片略劲爆):
Selenium就先介绍这么多,对于本次实战内容,已经足够。那么接下来,让我们聊聊xpath。
这个方法是非常强大的元素查找方式,使用这种方法几乎可以定位到页面上的任意元素。在正式开始使用XPath进行定位前,我们先了解下什么是XPath。XPath是XML Path的简称,由于HTML文档本身就是一个标准的XML页面,所以我们可以使用XPath的语法来定位页面元素。
假设我们现在以图所示HTML代码为例,要引用对应的对象,XPath语法如下:
绝对路径写法(只有一种),写法如下:
引用页面上的form元素(即源码中的第3行):
注意:
元素的xpath绝对路径可通过firebug直接查询。
一般不推荐使用绝对路径的写法,因为一旦页面结构发生变化,该路径也随之失效,必须重新写。
绝对路径以单/号表示,而下面要讲的相对路径则以表示,这个区别非常重要。另外需要多说一句的是,当xpath的路径以开头时,表示让Xpath解析引擎从文档的根节点开始解析。当xpath路径以开头时,则表示让xpath引擎从文档的任意符合的元素节点开始进行解析。而当出现在xpath路径中时,则表示寻找父节点的直接子节点,当出现在xpath路径中时,表示寻找父节点下任意符合条件的子节点,不管嵌套了多少层级(这些下面都有例子,大家可以参照来试验)。弄清这个原则,就可以理解其实xpath的路径可以绝对路径和相对路径混合在一起来进行表示,想怎么玩就怎么玩。
下面是相对路径的引用写法:
查找页面根元素:
查找页面上所有的input元素:
查找页面上第一个form元素内的直接子input元素(即只包括form元素的下一级input元素,使用绝对路径表示,单/号):
查找页面上第一个form元素内的所有子input元素(只要在form元素内的input都算,不管还嵌套了多少个其他标签,使用相对路径表示,双//号):
查找页面上第一个form元素:
查找页面上id为loginForm的form元素:
查找页面上具有name属性为username的input元素:
查找页面上id为loginForm的form元素下的第一个input元素:
查找页面具有name属性为contiune并且type属性为button的input元素:
查找页面上id为loginForm的form元素下第4个input元素:
Xpath功能很强大,所以也可以写得更加复杂一些,如下面图所示的HTML源码。
如果我们现在要引用id为“J_password”的input元素,该怎么写呢?我们可以像下面这样写:
也可以写成:
这里解释一下,其中//*[@id=’ J_login_form’]这一段是指在根元素下查找任意id为J_login_form的元素,此时相当于引用到了form元素。后面的路径必须按照源码的层级依次往下写。按照图(3)所示代码中,我们要找的input元素包含在一个dt标签内,而dt又包含在dl标签内,所以中间必须写上dl和dt两层,才到input这层。当然我们也可以用*号省略具体的标签名称,但元素的层级关系必须体现出来,比如我们不能写成//[@id=’J_login_form’]/input[@id=’J_password’],这样肯定会报错的。
前面讲的都是xpath中基于准确元素属性的定位,其实xpath作为定位神器也可以用于模糊匹配。本次实战,可以进行准确元素定位,因此就不讲模糊匹配了。如果有兴趣,可以自行了解。
4
以上面提到的文章为例,进行爬取讲解。URL :https://wenku.baidu.com/view/aa31a84bcf84b9d528ea7a2c.html
由于网页的百度文库页面复杂,可能抓取内容不全,因此使用User-Agent,模拟手机登录,然后打印文章标题,文章页数,并进行翻页。先看下这个网站。
我们需要找到两个元素的位置,一个是页码元素的位置,我们根据这个元素的位置,将浏览器的滑动窗口移动到这个位置,这样就可以避免click()下一页元素的时候,有元素遮挡。然后找到下一页元素的位置,然后根据下一页元素的位置,触发鼠标左键单击事件。
我们审查元素看一下,这两个元素:
我们根据这两个元素,就可以通过xpath查找元素位置,代码分别如下:
由于page元素有很多,所以我们使用find_elements_by_xpath()方法查找,然后使用page[-1],也就是链表中的最后一个元素的信息进行浏览器窗口滑动,代码如下:
运行效果,自动翻页了有木有!
爬取内容这里,使用之前重点讲过的BeautifulSoup就可以。这里不再细奖,审查元素,自己分析下就有了。代码如下:
爬取结果如下:
爬取的内容还是蛮规整的,对吧?
我们能够翻页,也能够爬取当前页面内容,代码稍作整合,就可以爬取所有页面的内容了!找下网页的规律就会发现,5页文章放在一个网页里。思路:爬取正文内容,再根据爬取到的文章页数,计算页数/5.0,得到一个分数,如果这个分数大于1,则翻页继续爬,如果小于或等于1,代表到最后一页了。停止翻页。有一点注意一下,翻页之后,等待延时一下,等待页面加载之后在爬取内容,这里,我们使用最简单的办法,用sleep()进行延时。因此总体代码如下:
瞧,最后一页的内容也爬取下来了,接下来的工作就简单了,把这个结果写到txt文件中,我这里就不再进行讲解了。
至此,整篇的内容,我们都爬取下来了。是不是很酷?那就开始动手实践吧!
5
这样爬取是可以爬取到内容,但是缺点也很明显:
没有处理图片内容,可以后续完善;
代码通用性不强,有的文章结构不是这样,需要对代码进行略微修改,才能爬取到内容;
对于上百页的内容爬取有些问题,翻页方式变了,需要换种方法处理,有兴趣的可以自己看下;
等待页面切换方法太out,可以使用显示等待的方式,等待页面加载;
selenium虽好,但是有些耗时,可以使用PhantomJS对这部分代码进行替换;
最后,我感觉我的方法可能有些low,如果有更好的方法,欢迎交流。
使用笔记本以及平板设备的朋友应该对设备电池健康状况比较关心,Win10系统中就提供了可查看设备电池详细使用报告的方法,感兴趣的朋友可以尝试一下。其实这项功能在Win7中就已存在,在Win8中进一步完善,报告也更加详细。
• 以管理员身份运行CMD,输入下面的命令回车,系统就会在你指定的路径生成设备电池使用报告。
powercfg /batteryreport /output “C:\battery_report.html”
• 双击C:\battery_report.html会用你默认的浏览器打开该报告,一起来简单了解一下:
▲系统以及电池基本信息,包括电池设计容量、完全充电容量、充电周期
▲设备电池完全充电容量变化
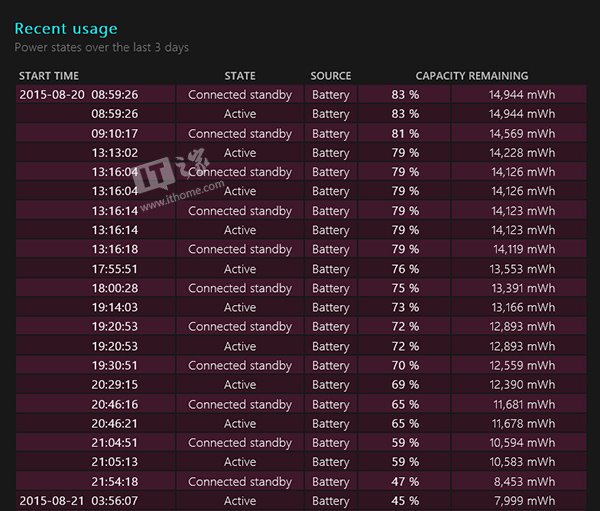
▲最近三日电池使用情况记录,包括何时处于活动状态以及何时进入待机状态
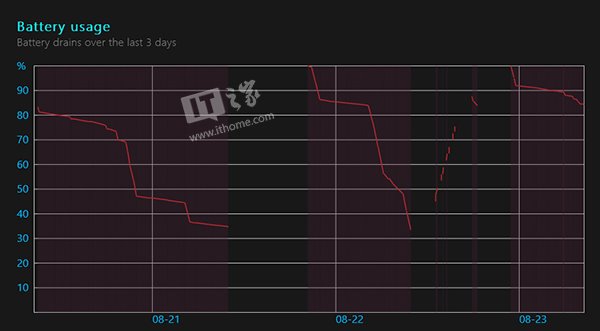
▲最近三日电池使用变化曲线
▲电池续航预估值变化,这里的数据比你在任务栏电池图标上看到的要准确
这份报告会详细记录自系统安装后电池的使用详情,根据这些数据可掌握电池续航变化情况。
这里有新鲜出炉的 Javascript 教程,程序狗速度看过来!
Javascript 是一种由 Netscape 的 LiveScript 发展而来的原型化继承的基于对象的动态类型的区分大小写的客户端脚本语言,主要目的是为了解决服务器端语言,比如 Perl,遗留的速度问题,为客户提供更流畅的浏览效果。
下面小编就为大家带来一篇 JS 判断是否在微信浏览器打开的简单实例 (推荐)。小编觉得挺不错的,现在就分享给大家,也给大家做个参考。一起跟随小编过来看看吧
最近做很多 HTML5 的项目,很多页面会通过微信微博等 SNS 分享出去。在分享页面上提供公司 APP 的下载。但是在很多应用的浏览器中,点击下载链接无法下载应用。那么针对这些浏览器我们需要给用户提示从 safari 或者系统自带的浏览器打开分享页面。通过 js 就可以判断当前页面是在什么浏览器打开的。
以下是一段示例代码,注释中表明了通过 JS 如何判断是否在微信浏览器打开,是否在 QQ 空间浏览器,是否在新浪微博打开。当然可以做得更完善一点,再加上判断是在移动设备打开还是在 PC 端浏览器打开的,更加细分一点,可以判断是在安卓系统的浏览器打开的还是 IOS 系统浏览器打开的。
再附上 browser 的代码,通过以下方法可以判断很多浏览器。包括判断 IE 浏览器,Opera 浏览器,苹果浏览器,谷歌浏览器,火狐浏览器等。
以上这篇 JS 判断是否在微信浏览器打开的简单实例 (推荐) 就是小编分享给大家的全部内容了,希望能给大家一个参考,也希望大家多多支持 phperz。